Saturday, January 21, 2012

Cinnamon Swirl Bread


My Mom used to make cinnamon swirl bread sometimes when I was a kid.  The other day I decided I had to have some!  I've worked with yeast breads before (with some success), but it has been many years.  I had just been to Costco and bought some fresh yeast and my other ingredients were fresh, so off I went.

America's Test Kitchen Family Baking Book

I only needed the yolks from my eggs, so I put the whites into a container (and marked it!) for the freezer - most likely destined to be a future Angel Food Cake.


King Arthur Flour has this cool yeast spoon that measures out exactly the amount of yeast in one of those little packets - 2.25 tsp.


Here's my ingredients all measured out...wasn't sure which way to go with it, so I did it both ways.


You mix the brown and white sugars and reserve some for the topping.  I made a little error here - I should also have mixed in the cinnamon at this point but I didn't figure that out until later.  I still used the cinnamon in the swirl part, but just lightly spread it around over the sugars.  It turned out fine, but I'll pay more attention next time.


I gently warmed up the milk, and whisked in the melted butter and the egg yolks here.


I put most of the flour and yeast salt and (cinnamon) sugar mixture in the mixer.


Then I slowly added the milk mixture into the dry with the mixer on low...this took about 2 minutes.


At this point I thought it needed a bit more of the flour, so I put in just a spoonful at a time till it came together.


Then I turned it out on a floured board...


...and smoothed it out into a ball.


I lightly oiled this bowl and put the dough in here to rise.  Then I also lightly oiled some cling film and put that on top.


Earlier I had turned my oven on low for a few minutes and then turned it off.  Here is where I put the dough to  rise.


 And here she is about an hour and a half later.  POUFY.


Then I turned it out on the board.  I wish I had a little bit bigger board but oh, well.  I tried to spread it out like they said, but the dough was a little rebellious and would only work with me so far.


Here is where I sprinkled the sugar mixture on and wondered, "What about the cinnamon?"...so I read more carefully and realized it should have been in there all along.  So I just dusted it on there and then rolled it up, pinched it closed, and put it in the lightly oiled pan seam side down.


Here's how she is after the second rise.


On goes a little more of the cinnamon sugar and a spritzing of water to keep it in place.


And here is the finished bread!  I liked how much this rose, but maybe next time I will use a slightly larger pan.  See the little gap in the bottom there?  Oops...gotta watch how I place it in the pan, too.


I think this 'tearing' effect is from the top not being nice and smooth going into the oven.  It didn't affect the taste at all.


And here are the lovely swirls!  If I had been able to spread the dough out more, I would've gotten a more swirly effect than this one, but I'll take this for a first effort. :-)

The only real problem this bread presented was the AWESOME yummy smell driving everybody crazy in the house until we could dig into it!


That little gap there came from not rolling the dough quite snugly enough in that spot.

Next time I will try it with raisins.


This experience has renewed an interest in bread-baking for me so I have been reading the bread books in my collection and hope to be doing more soon.  I always thought you were sorta locked into a time thing when working with breads - how long it has to rise, etc.  But as I'm reading, you can exercise a measure of control over the process - speeding up or slowing down the rising process.  I'm so excited about this, because maybe it means I won't have to always wait for a weekend day to try a new bread!


~ks

Sunday, January 15, 2012

Cake - Take #2

Last week's red velvet cake needed six egg yolks.  So I saved those extra whites and put them in the freezer for this week's cake - Angel Food Cake.  I went with a recipe from Cook's Illustrated.

Cook's Illustrated Cookbook

I still needed six more egg whites for this cake, so I've saved those extra yolks and will be doing a zabaglione a little later today...mmmm....

Now, I've never made an Angel Food Cake before.  I like them ok - I guess I've just typically gravitated toward a little bit richer cakes.  So I had to buy a new pan.

So first you need to separate your eggs.  I understand (by research, not my own experience) that this is easier done when the eggs are still cold from the fridge.  So I did that.  But the whipping of the whites is easier done with room temperature whites, so I let them sit on the counter for a little bit while I got the other things ready.

I like it when recipes are listed with weights for the ingredients - I have a little scale and I use it especially with baking.

I wisked half the sugar and the cake flour and set it aside.  Then I started whipping the egg whites with the cream of tartar and the salt - started kinda medium low for a minute, then increased to medium high for another minute.  Then I gradually added the other half of the sugar with the mixer going.  They only want you to get to 'soft peaks' here and that only takes another minute or two.  With egg white whipping, there are: soft peaks, firm or stiff peaks, and then there's waaaay too far, and there isn't much time in between these, so you have to stay close and pay attention.  I think I got to a pretty good place with my egg whites.  :-)   Then I added the vanilla, almond extract, and lemon juice - this you just beat till blended.

Then I sifted the flour/sugar mixture into the whites, a little at a time, and just gently folded each addition in.  I'm always afraid of deflating things at this point, so I try to be very gentle with folding.

Then I put the batter into the pan.  Since my pan has a removable bottom, I didn't treat the pan at all.  If you have a one-piece tube pan, they suggest that you cut out a parchment to lay into the pan so you can get the thing out later.  No greasing of the pan is necessary - in fact, you don't even want it because it will not be good for the egg whites as it won't allow them to 'climb' the pan and the batter won't rise.


Then it bakes in a low oven (325) for 50-60 minutes.  About half-way through, I did carefully turn it around in the interest of even baking.


Here she is right out of the oven.  Now it needs too cool for a looong time - like two hours and upside down, which is why the pan has those 'feet' on it.  If you have a tube pan without the feet, you could turn the pan over and put the center tube over a metal funnel or a slender bottle or something.  It needs to cool upside down so that it won't deflate.  I did check my pan several times along the way as to temperature, and it really did need that long to get completely cool.


Since my pan is in two pieces I did put it on a half sheet pan with some parchment -I had no idea if I'd get any leakage.


And, voila!  No leakage!  As good as that is, I will probably not bet on it anyway in the future, as a leak like that would be a pain in the neck to clean up off the oven floor.

To get the cake out of the pan I did have to gently run a butter knife around the inner and outer tube parts and it came right out.  Then I needed to run that knife between the pan bottom and cake bottom to get that to come off.


So I placed it on the plate this way - as it was in the pan.  My Grandmother said she usually flips it so the flatter side is up.  I didn't know the protocol and I don't know if it matters.  This isn't a 'gorgeous' cake by any means - but it really did come out very, very nice.  It would be great with fruit - sort of like a strawberry shortcake thing, it was good with ice cream, it was good by itself.  My family liked it - they said it was nice and tender and not 'tough' like the kind you get at the grocery store.  I will be doing this again.


I'm not sure if this was supposed to have risen more, but this was delicious as it was.

My Great-Grandmother was a young mother during the depression.  I guess they must've had chickens or some other easy access to eggs, because my Grandmother said that her Mom made one of these cakes every day back then.  Remember, no mixer - she just used something like this whip and her strong arm.  Wow.  I'm not sure I'd even want to try this without my trusty Kitchenaid mixer.


~ks

Tuesday, January 10, 2012

Time for Cake!

The America's Test Kitchen Family Baking Book

In my family we get together for all the birthdays in a month at one time.  I made the cake for the January birthdays, and I made Red Velvet Layer Cake with Vanilla Buttercream Frosting, both from ATK's Family Baking Book.

The cake was pretty straightforward.  I got two 9 inch cakes, one of which got a bit stuck in the pan - but I faked my way through that one...more to come...stay tuned...

Worth noting...it is a good idea to put strips of parchment or waxed paper down under the cake before you frost it so you can remove the messy extra frosting before presenting the cake to guests.


The really interesting part is it the frosting.  You start by whipping up six egg yolks (I saved the whites in the freezer for an Angel Food Cake later on).


Then you bring the sugar and corn syrup to a boil.


Here's the tricky part.  You have to carefully - and slowly - pour the boiling sugar liquid into the eggs while they are beating on a lower speed.  You have to try not to hit the side of the bowl, nor the beater.  Now, that's all the book says....nothing about WHY.  Well, that is a hard maneuver, so I didn't pull it off cleanly and then I found out WHY.  See all that stuff glommed on the side of the bowl?  It cools fast and stays stuck there so it (1) doesn't incorporate into your frosting, and (2) becomes really difficult to remove later.  I suggest being more careful than I was on this run.


Then you have to whip this for about 10 minutes - you have to beat it until the bowl is no longer warm.  This one they do explain:  you want it cooled down a bit before you put in the softened butter or else the frosting will 'break'.


This turns out nice and fluffy - easy to spread.


Ok, so back to the booboo.  See that missing chunk there?  It stayed in the pan.  I treated the pan, including a parchment round in there, but the parchment slipped a little, and where it slipped, the cake stayed in the pan.  So it pays to be careful with pan-prep.  (But I got a preview of the yummy cake!)


Anyway, I just frosted the flat surfaces first, and then carefully installed a big blob of frosting the gap.  Who could complain about extra frosting in their serving of cake?


As it turns out, it was among the remainder of the cake that I took home.


Here's how it looked going to the party.  I like easy frosting ideas - this peak effect was just done by pulling the spatula up quickly...a bunch of times.


Everyone liked the cake!  I will be doing it again for sure.  

Also, there was extra frosting, which my Mom always said is perfect for schmearing on Graham crackers.


Now I just need to get some Graham crackers....


~ks

Sunday, January 8, 2012

The North thinks it know how to make corn bread, but this is a gross superstition. Perhaps no bread in the world is quite as good as Southern corn bread, and perhaps no bread in the world is quite as bad as the Northern imitation of it. ~Mark Twain

Now here's a divisive topic.  I don't have a passionate view on the topic - I'm open to trying various versions.  I've made a more traditional Southern version before, so this time I wanted to go Northern.


Crescent Dragonwagon has written a really interesting book solely on the subject of cornbread - The Cornbread Gospels where she explores all the differences and nuances of the varieties of cornbread recipes out there.

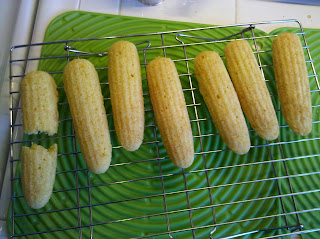
This time I made Vermont Maple-Sweetened Cornbread.  I always like a chance to use my cool Griswold cornstick pan (love eBay!).


In a previous experience with this pan, the recipe called for putting the pan into the oven during the pre-heat so that it gets nice and HOT and therefore would develop a nicer crust texture.  So I did that.  Then I put a little bit of butter in each slot - you do NOT want batter stuck in all of these nooks and crannies!


Then I used a portion scoop to put batter in each slot.


I put that into the oven - the recipe as written is for an 8 inch pan and calls for 20 minutes, but I was sure these would be done much sooner.  They were done at about 8 minutes.


Oops!  One broke....oh, well, the cook must eat it.  ;-)


This recipe was for an 8 inch pan, but done with the cornstick pan, I got about 19 cornsticks.  I took these to a family dinner and everyone liked them.  They were delicious with butter and honey on them...mmmmm.....


~ks

Most people hate the taste of beer to begin with. It is, however, a prejudice that many people have been able to overcome. ~Winston Churchill

My friend G. (who lives in another state) suggested we cook some dishes 'together' and compare them.  We decided to go with something French...which lead us to Mastering the Art of French Cooking (since I know we both have it), and we settled on Carbonnades a la Flamande - that is, Beef and Onions Braised in Beer as our first dish.

Mastering the Art of French Cooking (MTAOFC)

So the first part of the adventure took me to the store.  Julia said to get three pounds of 'lean beef from the chuck roast or rump'.  I am not too good with meat nomenclature - certain cuts are referred to differently in books and store and I don't always know the translation.  I ended up with some 'round eye roast' since it looked lean.  I'm not sure this is what she was after, but it turned out nice for us.  Although, I did have a little trouble cutting it neatly....maybe next time I will freeze it for 15 minutes or so to make it firmer.


The next new thing I learned was about beer.  Now, I'm not a big drinker - never have been.  So there's a lot I don't know about wine, beer, etc.  Julia called for a Pilsner, but I couldn't find it at my regular grocery store. We ended up going to a little liquor store and found some, but I still didn't get what was the big deal.  So I looked it up when I got home.


Pilsner

Turns out Pilsners are from Pilsen, in the Czech Republic.  They are what they are due to the particular hops that are used, as well as the unusually soft water there.  It is also 'bottom-fermented', which is a little beyond my ken.  Sometimes people call a beer a 'pilsner' when they mean something like 'premium', but that is a misuse of the word.

ANYway, it did turn out to be a nice beer and was worth the hunt.

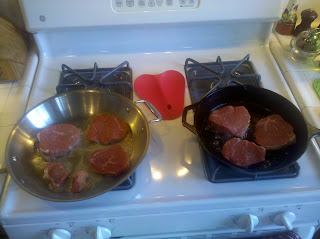
Ok, so first I browned the meat:


Then I set it aside.


And cooked the onions for a bit in that pan.


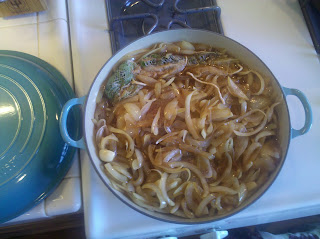
Then I got out my nice braising pan and layered in half the beef, half the onions, and repeat.


Meanwhile, I put a cup of beef stock (I used Better Than Bouillon) into the pan and deglazed it.  That broth went into the braiser and my pan got most of the way cleaned up...


Then I put in one bottle of my Pilsner and an herb bundle (it's tucked into the liquid up there at the top), brought it to a simmer on the stove, and put it into the oven for about two and a half hours.  Julia said to watch that it stays just at a simmer, so I ended up turning down my oven just a bit.

That's just about it.  All that was left was removing the spent herbs, pouring the liquid off into a small saucepan and putting a red wine vinegar/arrowroot mixture into it and simmering that for a few minutes before returning it to the pan.  Viola!   (Sorry I don't have more final pictures, but they seem to have fallen into a black hole.)

In the last 45 minutes or so of oven time, I got to work on some Pommes de Terre Sautees - Potatoes Sauteed in Butter - also from MTAOFC.  This was pretty easy, though I did wimp out on a bit of technique.  Julia tells you to cut the potatoes into 'elongated olive shapes all the same size...cut them smoothly so they will roll around easily and color evenly' she says.  Pooh.  Sorry, Julia, I love you to pieces, but I don't have time for that.  I just cut them as uniformly as I could and made sure to stir them frequently.  I cooked them in some butter and olive oil for several minutes at a fairly hot temp.  Then I salted them and turned down the heat, covered them, and let them go for about 15 more minutes.  Then, off heat, I added a bit more softened butter and some minced parsley.  Yum.


These were both great dishes - we gobbled them up at my house!  A French "Meat and Potatoes" sort of thing.  The beef dish was a good company dish as you do most of the work up front and the braising just makes its own magic in the oven.  That leaves you plenty of time to attend to another dish or dishes if you want.  The Pilsner was nice in it - not overpowering or even 'beer-y' in the final taste - if that makes sense.  The potatoes were easy - so easy I won't even need to refer to the book next time.

They were both delicious!  Thanks, G. for the suggestion - this was fun!


~ks